IK & Constraints [since v1.8.3b1]
This document is for the new CCDIK & Constraint systems, which is added since Skele v1.8.3b1;
It will be consist of two parts : (1) editor usage (2) runtime usage;
1. Editor Usage
1.1 Enable CCD IK
The new CCD IK implementation could be used to replace the old IK implementation in SMREditor.
Currently SMREditor still uses the old IK as the default IK solver, if you want to try the new IK solver, just click the button to enable.
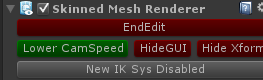
( Click the button to make it display "New IK Sys Enabled" )
1.2 Add constraints on joints
We could add constraints component on joints to improve the quality of IK solution.
The constraints component could be used both in edit-mode and game-mode;
Currently there're two different types of constraints;
(1) Angle Constraint:
Angle constraint is to limit the joint to only rotate along ONE axis. You could also define the valid range of the rotation angle.
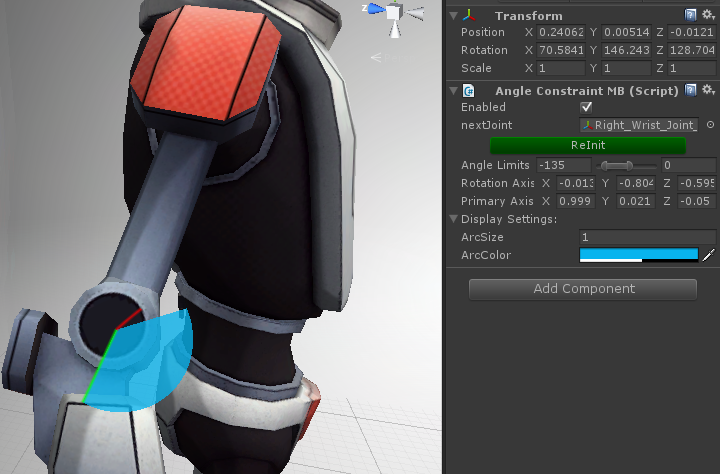
(1.1) Setup
Just add the component, if we're lucky, all the things will be setup automatically.
The red axis: the rotation axis, which the joint will rotate around
The green axis: the primary axis, which points the direction of 0 degree.
* What if the red-axis is pointing wrong direction?
The red-axis is supposed to be perpendicular to the two bones linked to this joint. But if the two bones are in the same line, the red axis could get the wrong result.
In such case, just rotate the forearm inward a little and click the "ReInit" button,
(1.2) Fields intro
- Enabled: if this toggle is unchecked, IK solver will not try applying this constraint;
- nextJoint: usually, this is auto-set to the first child of the joint transform, you could change it if necessary.
- ReInit: clicking this button will trigger calculation of all parameters.
- Angle Limits: limit the valid range of angles when rotate around the "Rotation Axis", ([-180f, 180f], LHS)
- Rotation Axis: in 95% cases, you should not change it by hand, just click the ReInit button after rotate the child bone and let the editor to calculate the cross-product for you
- Primary Axis: in 95% cases, you don't need to change it by hand, this axis by default is in the same direction of the parent bone;
- Display Settings: some gizmos settings, the changes made here are only valid in one Unity session. You could make permanent changes in the "Edit/Preferences/Skele" settings;
About Angle Limits, it should be <-135, 0> for elbow and knee joints in usual case,
(2) Cone Constraint
Cone Constraint limits the angle between the bone and a reference axis in specified range.
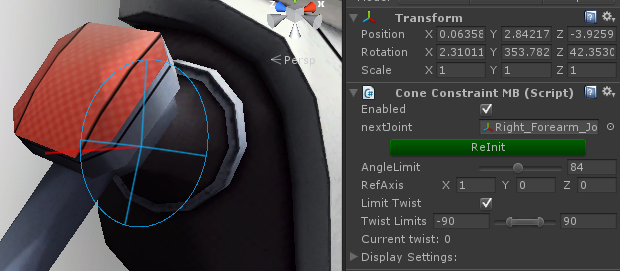
(2.1) Setup
Just add the component, if we're lucky, all the things will be setup automatically.
The red axis: the reference axis, the angle between the bone and this axis cannot exceed the specified limit.
The reference axis is by default in the same direction of the (this.position - parent.position);
If you need to change the cone's base direction, just modify it as you like.
"Twist" is defined by how much you've rotated around the bone axis (nextJoint.position - this.position) from the init state;
The init state could be updated by clicking the "ReInit" button.
(2.2) Field Info
- Enabled: if this toggle is unchecked, IK solver will not try applying this constraint;
- nextJoint: usually, this is auto-set to the first child of the joint transform, you could change it if necessary.
- ReInit: clicking this button will trigger calculation of all parameters.
- Angle Limits: the upper limit of angle between refAxis and the bone [0, 180f]
- Ref Axis: the red axis, used to calculate the angle with bone;
- Limit Twist: if unchecked, will not limit the twist around bone axis;
- Twist Limits: the limits of rotation around bone axis, ([-180f, 180f], LHS);
- Display Settings: some gizmos settings, the changes made here are only valid in one Unity session. You could make permanent changes in the "Edit/Preferences/Skele" settings;
The angle limit for shoulder should be around 90d to 110d in usual case;
The angle limit for thigh should be around 125d, might also need to rotate the refAxis to make sure the leg could raise up without hindrance;
The twist limit for shoulder and neck should be [-90d, 90d] in usual case;
The twist limit for thigh and spine should be about [-45d, 45d] in usual case;
1.3 Usage in SMREditor
No change, the same as before.2. Runtime Usage
In order to use CCD IK in runtime, there're two methods:- Add CCDSolverMB monobehaviour at pre-defined endJoints, and retrieve CCDSolver from them during runtime;
- Directly create CCDSolver instances in runtime;
After you get CCDSolver instance, you could execute IK calculation by:
solver.Target = <targetPos>;
solver.Execute();
You could check MarkerCtrl.cs for examples;
(1) CCDSolverMB monoBehaviour
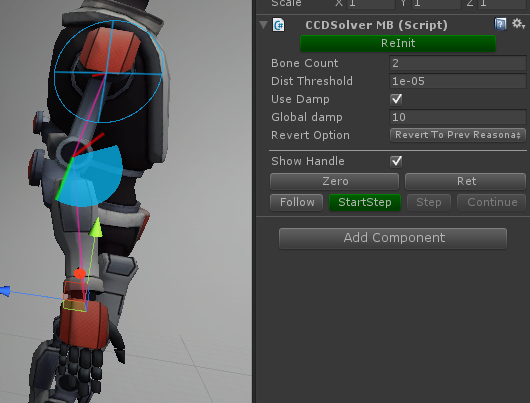
Adding a monoBehaviour helps saving the IK settings in the gameObject.
(1.1) Fields explanations:
- Bone Count: the bone is counted upward along the hierarchy. (default: 2)
- Dist Threshold: If the distance between endJoint & target is less than the threshold, the IK solver will consider the solution is found and return immediately; (default: 1e-05)
- Use Damp: limit the angle one joint can rotate at most in one iteration; (default: on)
- Global Damp: the damp limit, in degree (default: 10)
- Revert Option: If IK solver cannot make endJoint reach target, and cannot make the last bone point toward the target, the result is considered "unreasonable". When such case happens, solver could revert the result according to the option.
(1) No revert: just let it be, do nothing;
(2) Revert to start state: revert all joints before IK solver starts to work;
(3) Revert to Prev Reasonable result: revert to prev reasonable solution, if none, then the init pose;
- Show Handle: show a position handle to indicate targetPos, used to manual trigger IK calculation;
- Zero: make all the joints' localRotation in IK chain to be Quaternion.identity;
- Ret: make the position handle to return to the endJoint position;
- Follow: make the IK solver to calculate a solution to reach targetPos;
- StartStep: For debug use, split the IK iteration into many steps for human eye inspection.
- Step: make one step in IK iteration;
- Continue: no more single steps, directly go though to the end of IK calculation;
CCDSolver solver = mb.GetSolver(); //mb is the MonoBehaviour
(2) Create Solver in script
Just directly create it and call the SetBones method, if you want to use parameters different from default, just call the public properties on the CCDSolver.
CCDSolver solver = new CCDSolver();
solver.SetBones(endJoint, boneCount);
Customer support service by UserEcho
